User Guide
Welcome to the Automa.Net user guide!
If you won’t find an answer to your questions, please contact us at [email protected] or call +48 17 778 34 19
Or book a short 15 min meeting with us HERE >>
The process is simple and takes less than a minute!
First of all, search for parts by using commonly known manufacturer part numbers (MPN). Our system understands the different ways people keep and search for parts numbers so don’t worry about different symbols like. / ; , or spaces – we will find your part anyway!
Browse the search results and tick the ‘RFQ’ button on the right-hand side.
Once ticked, fill out the form at the bottom of the screen and click ‘Send RFQ’. This will send out separate emails to companies you have ticked with a request to quote. The price and the lead time will arrive directly in your email box. Expect the first answer in a couple of hours.
WATCH THE VIDEO >>
This simple answer is: send your file to [email protected]
If you want to however prepare more data and adjust to our inventory template file, please do check the 1-5 steps guide on the “My Inventory” page once you log in to Automa.Net
To make a copy of the template, select File > Make A Copy, and that will create an editable template. To create a local copy, select File > Download.
READ OUR FULL INVENTORY GUIDE HERE >>
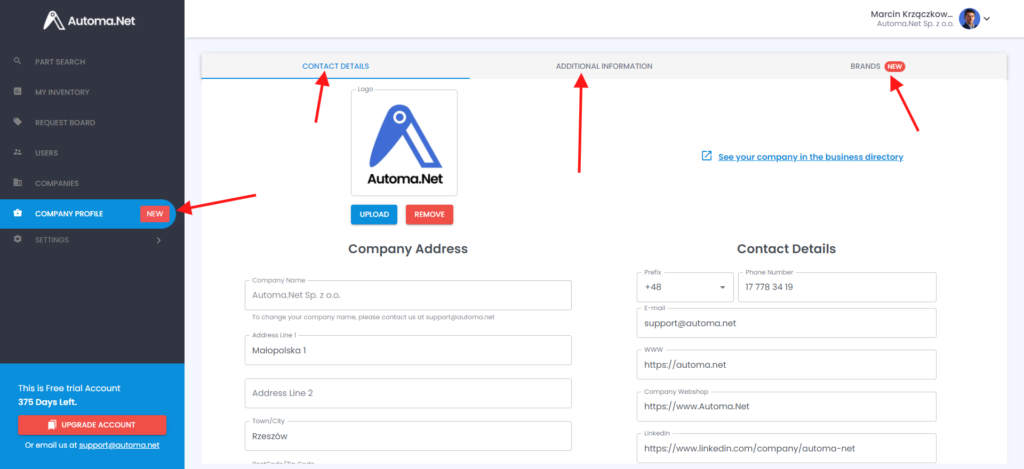
On the ‘Company Profile‘ page you can add a lot of valuable information about your company. This information is being used across the Automa.Net website to market your company and your services to other trade companies and end-users of automation products.
There are 3 tabs on this page:
1. Contact Details – basic contact information about your company including social links and your company phone number
2. Additional Information – information that helps establish the credibility of your company on our platform. About Us section, company number, VAT number and other fields here will be displayed on your profile inside the Automa.Net portal.
3. Brands – this is where you can specify what are your TOP trading brands as well as the brand you generally have available.
To make it easy to compare different offers across suppliers it’s important that you get familiar with the way we display the data. Most of it is intuitive, however you might want to get to know the details, so you could be more confident when sending RFQ and buying on Automa.Net
The Search Results column and a typical result looks like this, see a detailed explanation of each area below. 
(1) QTY – Quantity available at the suppliers stock
(2) + (4) – Status and the Handling Time
Each offer has a “Status” and “Handling Time” data. “Status” indicates the confidence level that you could get this part quickly and from stock. “Handling Time” is the amount of time the supplier takes to make the product ready to be shipped (so it’s not a total delivery time)
There are different colours of the “Status” label, based on a few key factors.
GREEN status label “In-Stock” appear at the offers where:
- The product and the quantity was updated in the last 48h
- The handling time is between 1-2 business days (example below “1 Business day”)
YELLOW status label “In-Stock” with a clock appears at the offers where:
- The product and the quantity was updated in the last 48h
- The handling time is 3 business days or longer (in the example below “4-6 Business days”) or unknown (not provided by the seller)
GREY status label “In-Stock” appears at the offers where:
- The product and the quantity wasn’t updated in the last 48h

You can hover over the status label to see when the offer was updated (product information and quantity)


(3) Condition
We try to display a limited amount of product conditions across our offers. If our system matched supplier product condition with our list of product conditions, we will display the mapped product condition name. In the case below a supplier uploaded products with condition “NS” which is a common naming convention for “New Surplus”. We have mapped “NS” provided by the supplier to “New Surplus” condition.

These are the conditions available on Automa.Net:
New – A brand-new, unused, undamaged item.
New Surplus – An unused component that has been lying unsold in the warehouse for a very long time.
New Opened – A new, unused, undamaged item with original packaging, open box.
New Sealed – A brand-new, unused, unopened, undamaged item in its original packaging, factory sealed.
New No Box – A new, unused, undamaged item without original packaging
Refurbished – Refurbished. item was inspected, cleaned, and repaired to full working order and is in excellent condition
Repair – Supplier indicates that they repair this item
Used – The item was previously used. The item may have some signs of cosmetic wear, but it is fully operational and functions as intended. The item may be missing original packaging.
Defective – An item that does not function as intended or is not fully operational. This includes items that are defective in ways that render them difficult to use, items that require service or repair, or items missing essential components. See the seller’s listing for full details.
Exchange – Supplier indicates that they can accept a faulty item and provide you with a refurbished/new one
Incomplete – incomplete component, could be non-working
Our system will try to recognise product condition from Your stock list and assign it to one of the above conditions. Eg if you load condition “NS” we will map it as “New Surplus”.
Warranty
This value is also visible in the “Condition” (3) column. Indicates the warranty provided by the supplier for this particular item. If there is warranty provided by the supplier, we will indicate it with the following symbol:
 The warranty time is being displayed when you hover over the icon
(5) Brand
Brand of the part. We are matching brands, so if you upload the part as “SIEMEN” it will be matched to “Siemens”. You can always have a look what brand data supplier provided by hovering over a brand name

(6) Company
Company name. Click to view more details or company profile where you can find information about team members, company reviews, trade terms and much more.
(7) Inquire
In this column you can tick which offers you want to inquire about.
(8) Filters
You can filter your results
AUTHORIZED SUPPLIERS
You might see on some parts results a badge “Authorized Supplier”. This means that this particular distributor is an authorized supplier for the given brand. To become a verified and authorized supplier, you need to provide us documentation/links and send them over to [email protected]

DEALS is a module that aims to connect the buyer and the seller on every level so they could reach the “DEAL” as quickly as possible. We are supporting both purchasing and sales team to optimize their work day, create visibility on what everyone is working on and provide tools to finish buying and selling processes quicker.
5 minute intro video available here (BUYER SIDE)
REQUEST FOR QUOTATION (RFQ)
Every deal object starts with an RFQ (request for quotations, pl: zapytanie ofertowe)
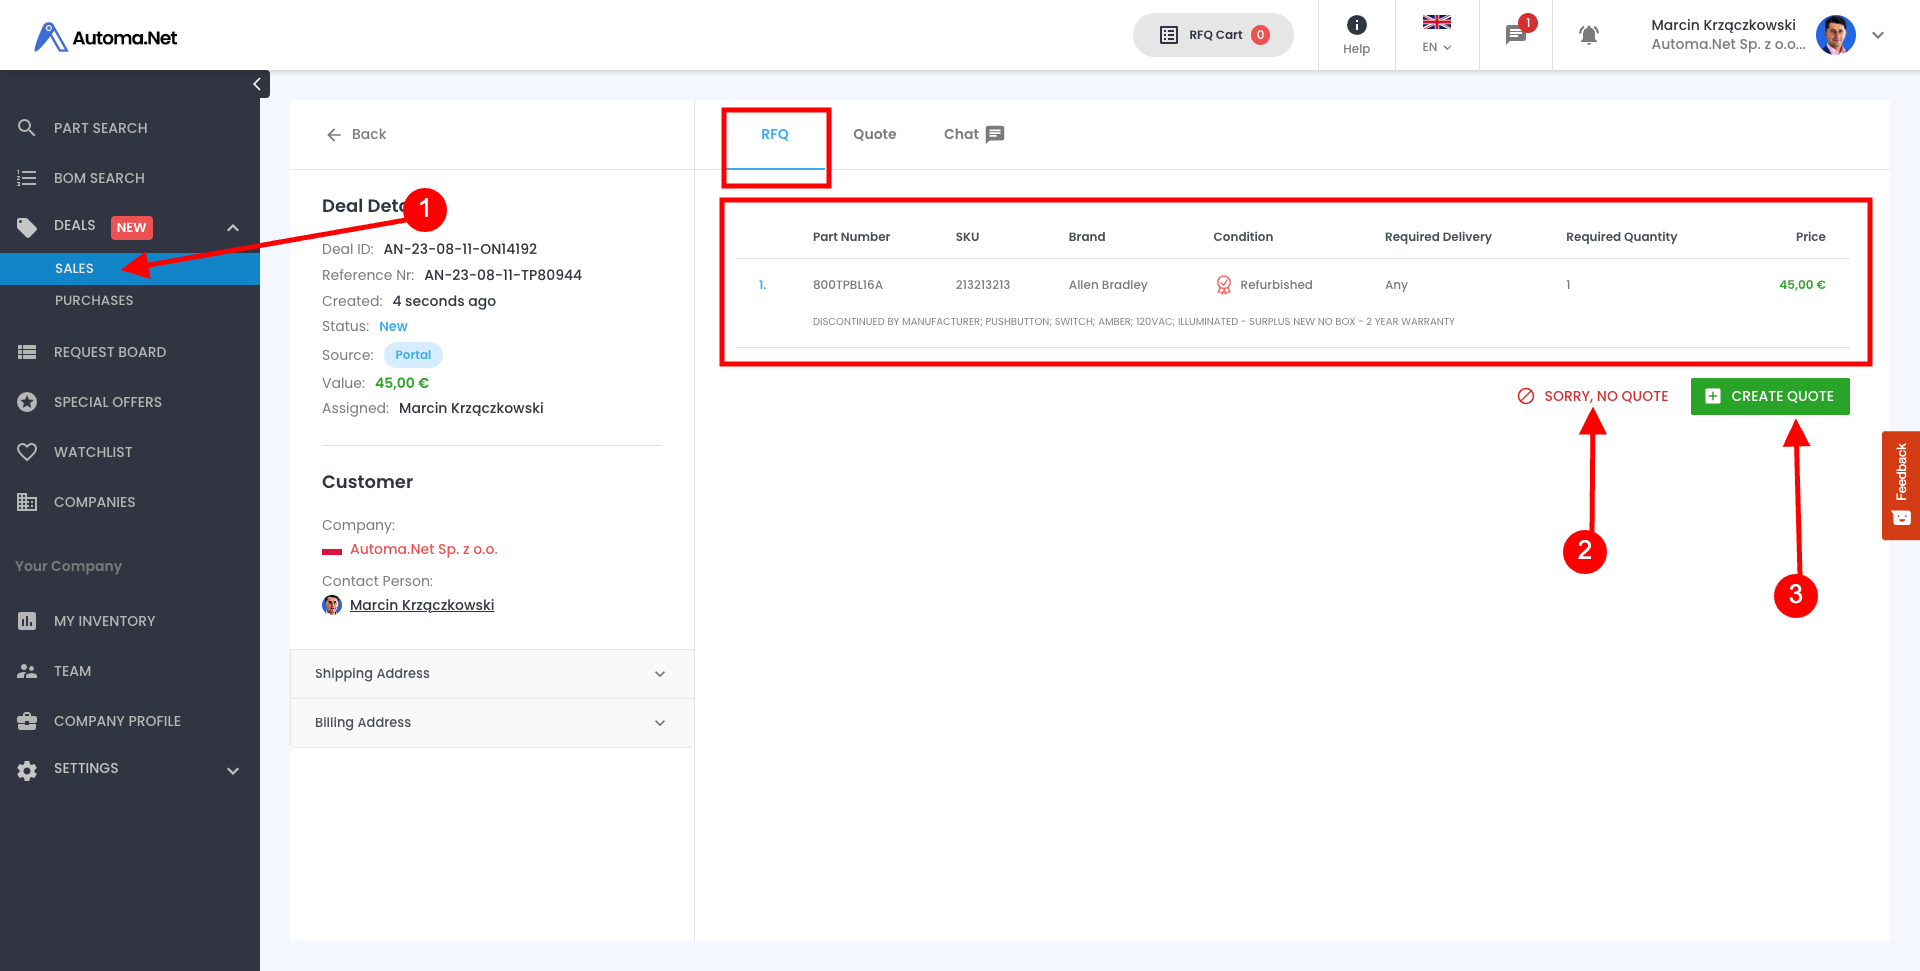
When you send or receive an RFQ, a new deal is created. From now on a DEAL (1) will have all the information about this purchase or sale. So RFQ, Quote, Payment information, Order information, shipment, trade terms, prices, availability, internal notes and even a CHAT history where you can negotiate and discuss further details with another party.
Once you receive RFQ, you can reply to it by clicking on the “CREATE QUOTE” (3) button, or in case you cannot quote, you can click “SORRY, NO QUOTE” (2)
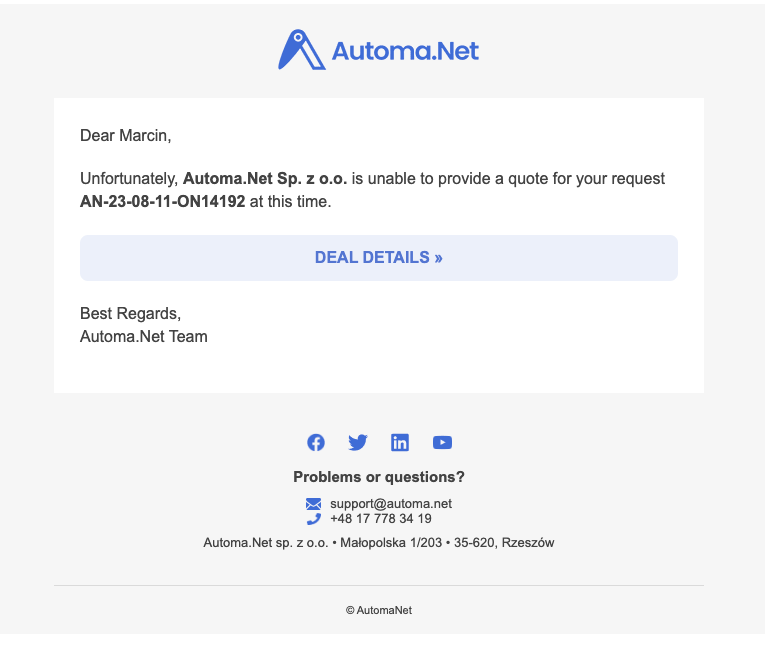
“SORRY, NO QUOTE” generates automatically an email that looks like this:
QUOTE
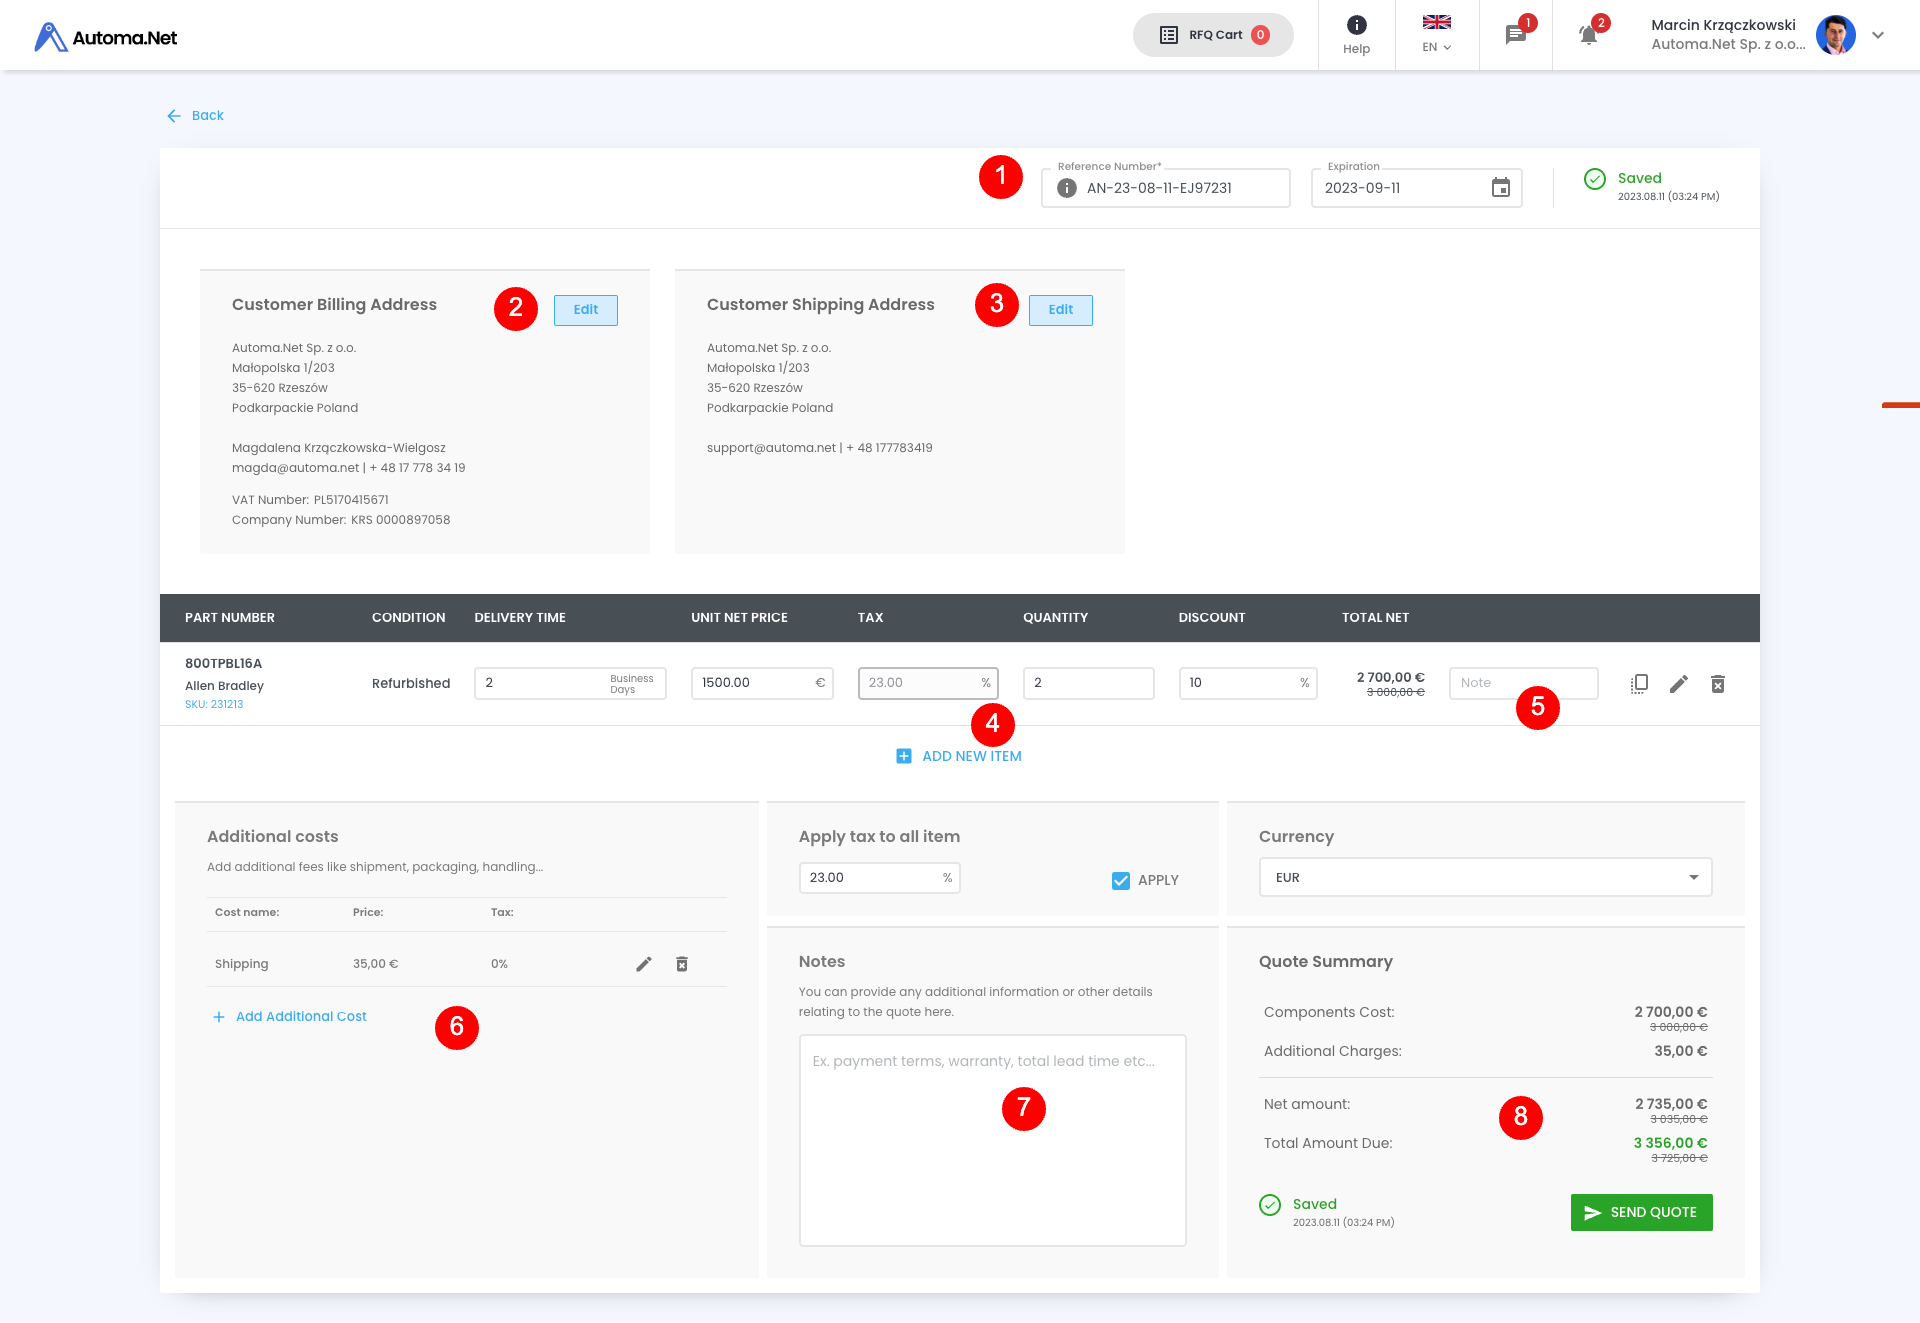
Once you start creating a QUOTE, as a response to RFQ, you have multiple options
- In the first line, you can assign your quote reference that will be visible to your team and the customer. Next specify when the quote expires. After quote expiration, the buyer cannot accept it anymore, however if you talk through chat, you will be able to reopen the quote.
- And (3) – Here you can see billing address and shipping address provided by the seller. You can change it if needed
(4) You can add additional components to your quotation. For each line quotes you can also add additional notes (5).
In number (6) you can specify any additional costs like “Packaging” or “Shipping” You can add item name, price and tax rate.
At notes (7) add any other important information for the buyer. This note will be displayed in automatically generated email (at the top) as well as in the “Quote” section of the deal.
In the Quote Summary section (8) you can see the total amount of the quote when it comes to components as well as additional charges. You can click close the quote at any time, even if it’s not finished- it will be saved as draft. The buyer will then see the status of the deal as “in progress”
When you are ready click “Send Quote” (8) to send your quotation to the buyer.
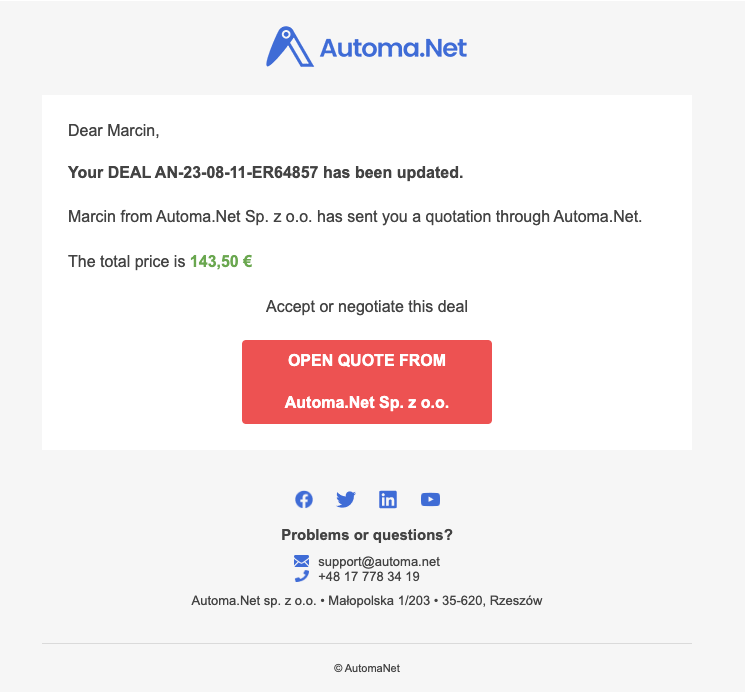
This is how your email with quotation will look like:
SUBJECT: New Quote AN-23-08-11-ER64857 – DEAL with Automa.Net Sp. z o.o. – 143,50
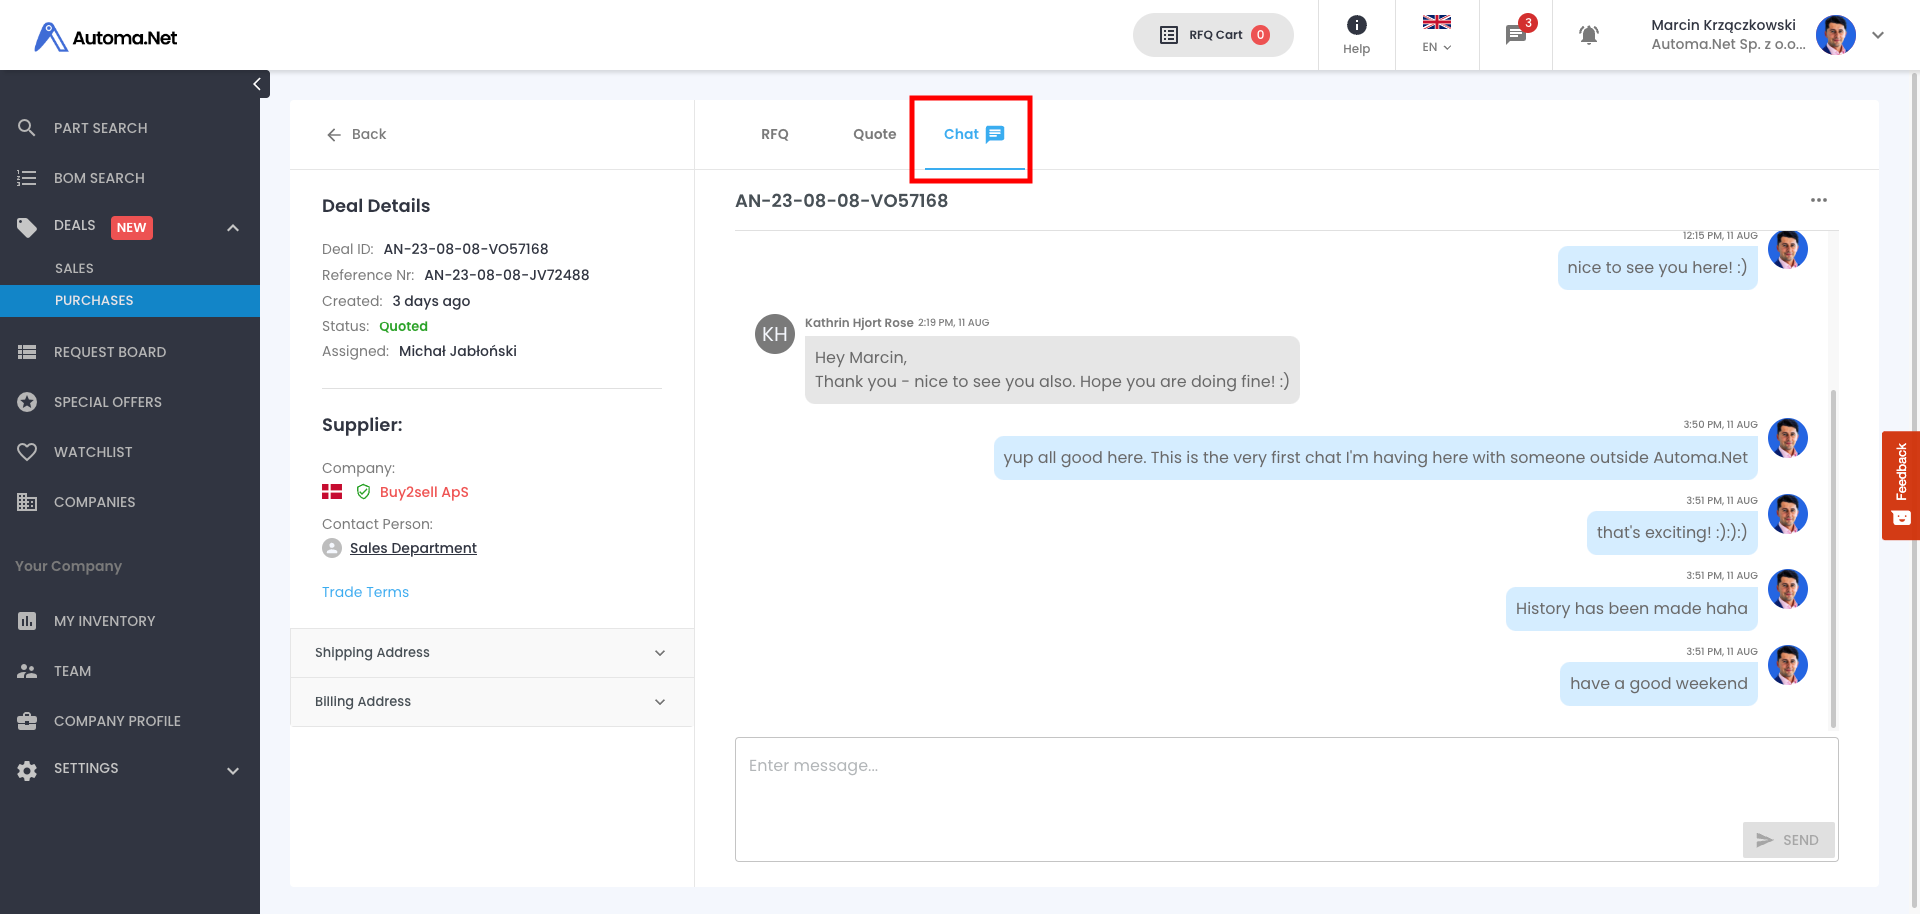
CHAT – Quickest way to reach a DEAL! 💬💬💬 🤝
Anyone like a good old CHAT! It’s also possible to conduct a chat on each new deal that you have started on Automa.Net – we think there is no better way to finish a deal with a customer or supplier than by talking with them and doing a virtual hand shake!
To start a chat simply go to a “CHAT” tab on a DEAL
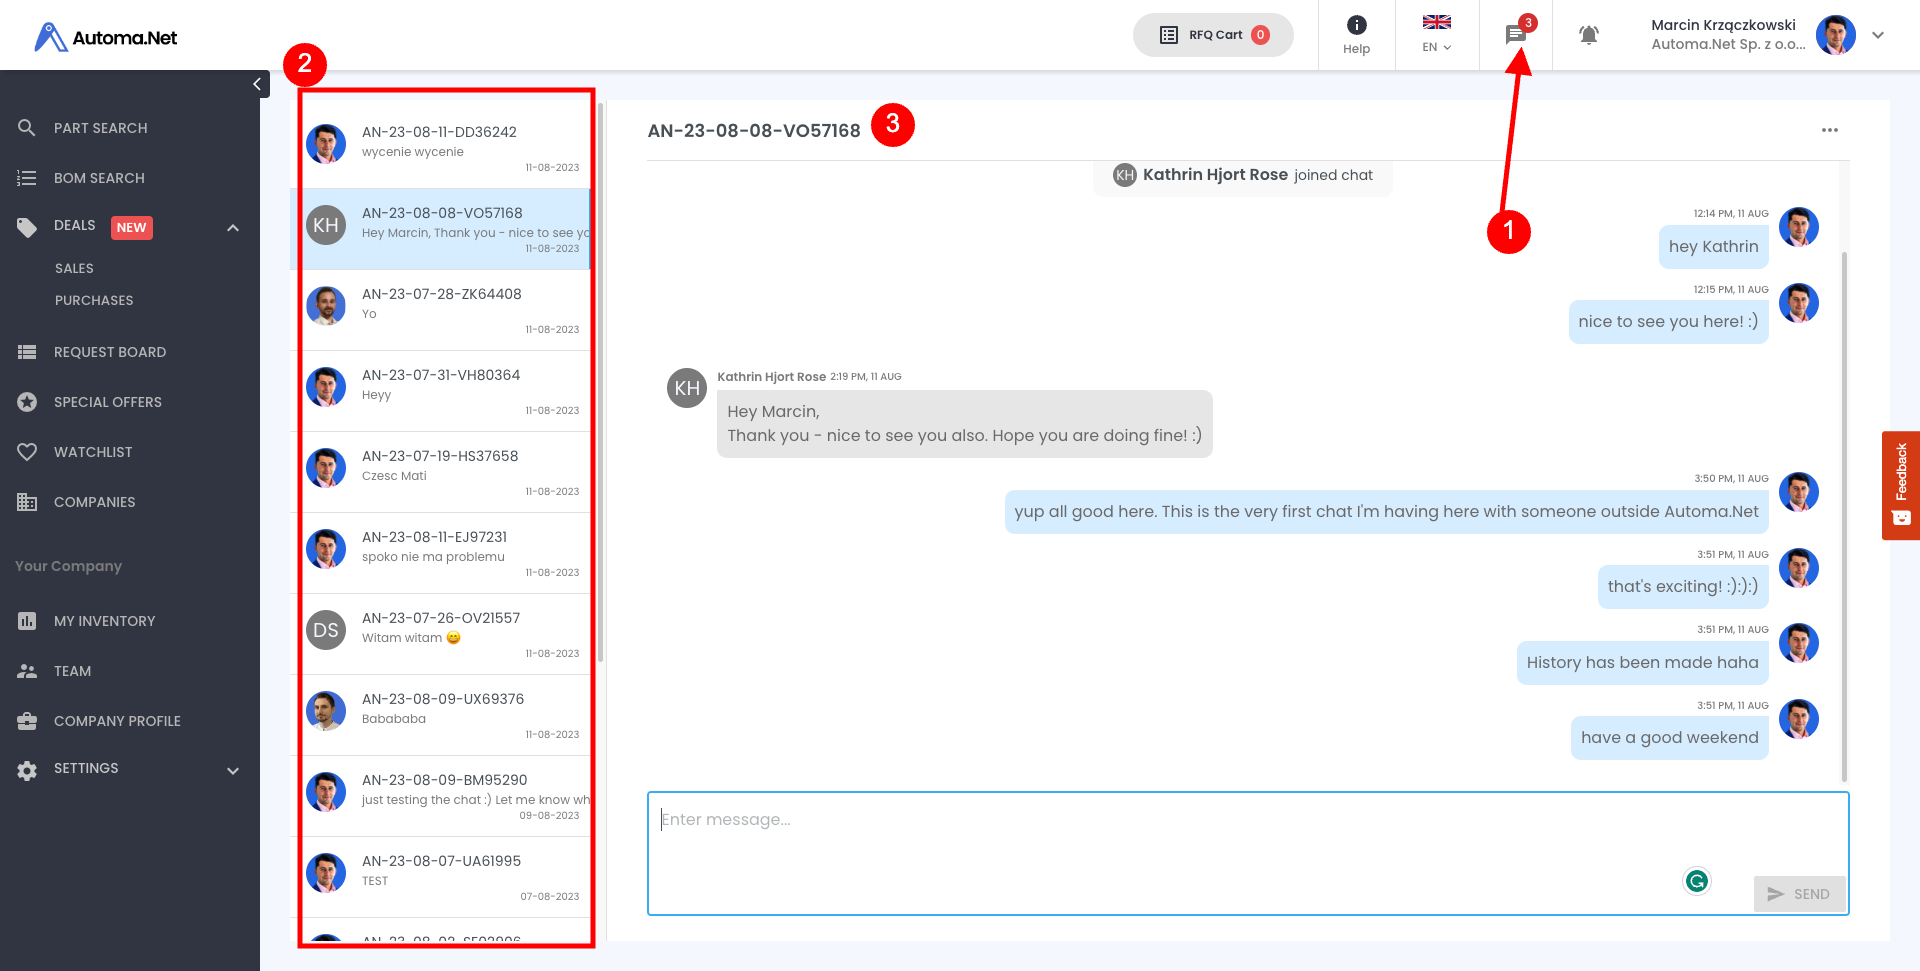
You can also see all the CHATS that you participate in here:
(1) This little icon will tell you whether there are any new messages needing your attention
(2) A list of all the chats you participate in
(3) a quick way to go to a DEAL details
PAYMENT METHODS
If you want to sell effectively on Automa.Net as a seller, you need to add available payment methods that the buy could choose to finalize the transaction and create an order with you.
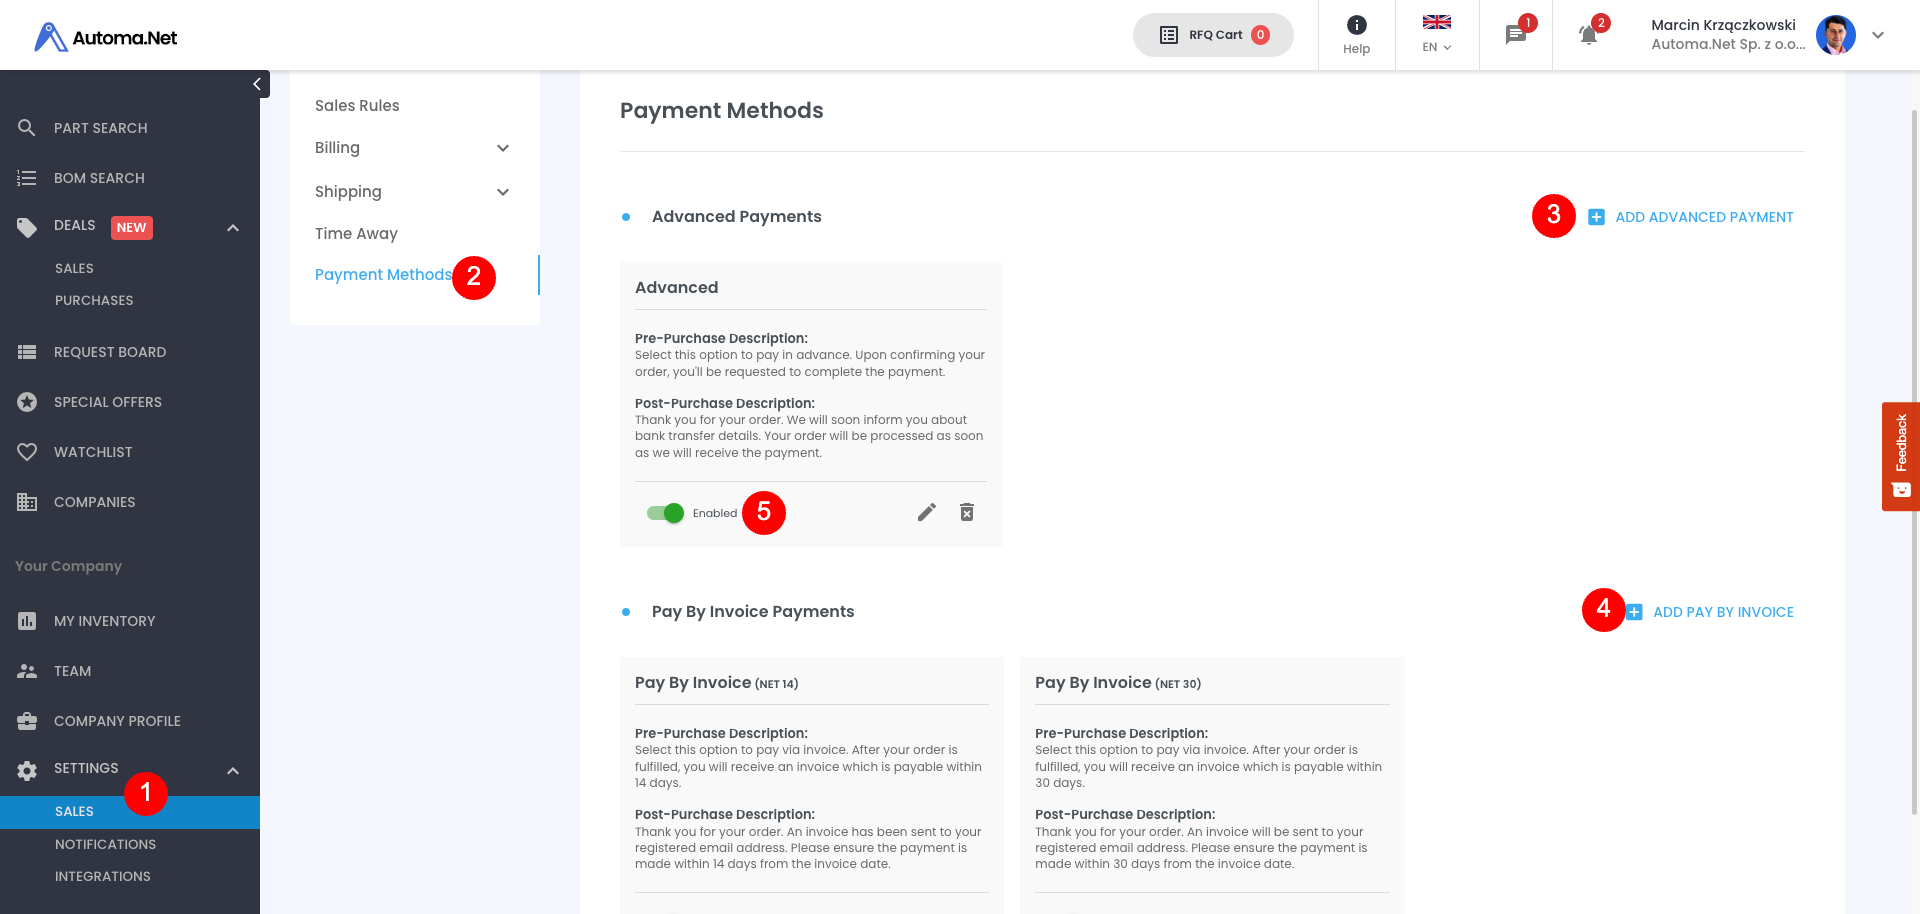
To set up payment methods Settings > Sales (1) and Payment Methods (2)
Here you can add different type of payment methods. To add a new one or connect external payment gateways, click on a blue “ADD XYZ PAYMENT” on the right hand side (3)
For each payment method you can add pre and post purchase description that will be displayed to your customers before and after they make a purchase with you. You can also enable or disable globally your payment methods (5).
TRADE TERMS
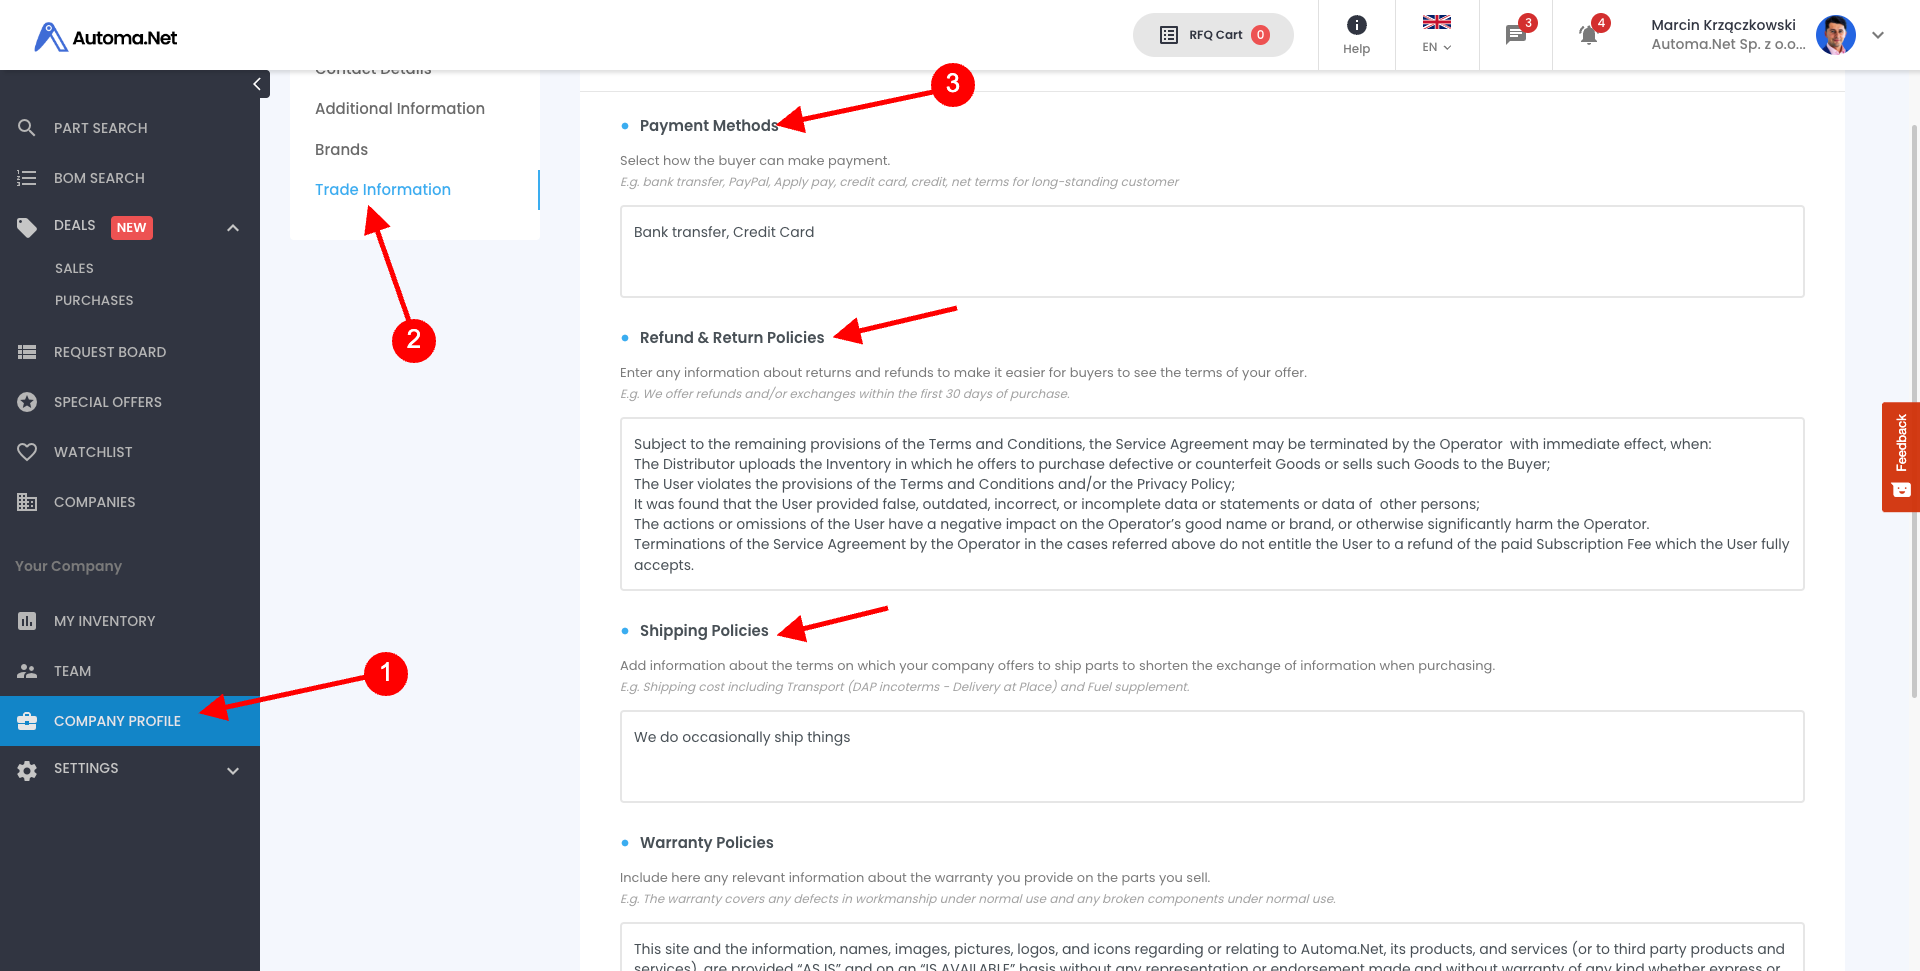
On each quote you send we will display your trade terms like payment methods you generally accept, shipping policy, returns policy and more.
To set up the trade terms go to Company Profile > Trade Information (2)
Fill out the boxes for each of your trade terms & policies (3)
